Monday, 2 July 2012

Book review: Style Me Vintage: A guide to sourcing and creating retro looks’ by Naomi Thompson


“I love that every dress, every bag, every scarf has a story that it would tell, if only it were able, and that I’m adding a chapter to that story. No modern item has ever made me feel as elegant or unique as a vintage one. Quite simply, vintage has magic.”

This quote from the introduction sums up much of what attracted me to vintage clothing myself, which put me in a good mind to enjoy this book from the start, having been given it as a gift from my mother in law (isn’t it nice to have relatives who know and appreciate the things you like?)

This is a rather lovely little book that focuses not as much on the detail of fashion history as on being a succinct introduction to wearing vintage for those just starting to get interested in it. I wish this had been published ten years ago when I was just starting to get into vintage clothes myself, as it makes for a very accessible introduction with some very helpful advice for beginners.

The book provides a short and succinct introduction to each decade from the 1920s to the 1980s, highlighting key trends in ‘shopping lists’ for each. It’s beautifully designed and illustrated, with modern photographs of day and evening ensembles for each era. I particularly like that the book uses real vintage enthusiasts as it’s models instead of professionals – the ladies displaying the clothes will be familiar to anyone who likes to read a lot of blogs about vintage. One of the great things about the vintage scene is that it inherently celebrates all shapes and sizes of women (since different eras had different ‘ideals’ of what the female body should look like) instead of the constant onslaught of skinny size zero models that modern fashion world pushes onto us. The ladies featured all look completely gorgeous in their outfits, but I think the fact they are all not just models but real women who wear these clothes day to day themselves helps to emphasise to the new comer how accessible vintage fashion really is.

The amount of information on each era is limited, which is sensible given the amount of very detailed fashion history books out there, and as the author says “Learning to date vintage is like learning a language. After a good while of looking at many styles, stitches and patterns, buttons and prints, it just clicks.” She’s entirely right – reading, research, looking at, touching and feeling vintage clothing over a period of time is the only way to get that kind of knowledge and confidence about what you’re buying. This book just provides a simple and accessible starting point for the new comer. Where the book is more useful is in it’s other sections, which include pages on what vintage is, dating vintage, tips for buying vintage, wearing the right underwear, where to shop and so forth. I thought the sections on how to get into vintage clothes (literally) and how to repair and maintain vintage particularly good – if only I’d had the advice here on getting into vintage clothes ten years ago, before a few awkward experiences getting ‘stuck’ in clothes taught me these lessons by experience!

Although this is a book primarily for new comers, there are still a few things of interest for those of us who’ve been into vintage a little longer. There are some great quotes scattered throughout – my favourite being one from Yves Saint Laurent: “Over the years I have learned that what is important in a dress is the woman who is wearing it’. There are also a couple of things I didn’t know – such as using a spritz of vodka to refresh the armpits of garments that can’t be washed, and that the term bikini comes from Bikini Atoll, a nuclear bomb testing site (how I missed this one, I don’t know, but it shows there’s always more to learn about fashion history, which is what keeps it interesting…)

The one real critique I would have is that the recommended readings ection only includes links to websites and blogs – many of them very good ones for sure – but for someone starting to get interested in vintage fashion, it might have been nice if there had been a list of other useful books on fashion history (although I suppose the publishers may have been unkeen on promoting other books here). Beyond that, this will be a great little book to lend out to/ recommend/give to friends that come and ask me where to start as they begin browsing vintage clothing.

There are two other books in the same series – one on hair and one on make-up, both of which I’m now quite keen to get hold of;

Wednesday, 13 June 2012

Sheltland Lace Knitting heirloom Christening shawl


My mother has been knitting since she was a small child; she grew up during the second world war in a family that wasn't too well off, so learning to knit at an early age was extremely important, and so, as you can imagine, she is an extremely skilled knitter. I was expecting this would mean I would get lots of lovely traditional knitted baby clothes from her (knitted baby clothes being one of the easiest ways to get vintage looking baby clothes these days, in my view). Well, she did knit a couple of cardigans, but in fact she turned her hand to knitting an 'heirloom' shawl for baby of such complexity that it's taken her six months!

The finished shawl is however, extremely beautiful (so much so I'm a bit scared to let baby near it in case of puke etc!), and also, it turns out, an interesting little peice of textile and fashion history, because it is a Shetland lace knitting 'wedding ring shawl'. These shawls are openwork knitting with incredibly fine yarn that are supposed to be so fine they are able to pass through a wedding ring.


My mother told me that "they were usually made for a wedding present, and could be worn over a wedding dress, and was then ready for the first child! Imagine knitting it in a Shetland croft, in the winter, by candle light! They are supposed to be fine enough to pass through a wedding ring, but yours doesnt, I have tried it."

My mum is disabled and this slows down the rate at which she can knit, and she estimates it took her about 408 hours to do, but the pattern is so intricate even a proficient able bodied knitter would have taken a great amount of time to produce it. The wool is Jamiesons Ultra Cobweb (ie single ply)  50% Shetland wool and 50% lambswool.

Intrigued by the romantic story, I have done a bit of searching to find out more about the history of these shawls. It turns out they were a highly fashionable luxury product during the Victorian era, and I found an excellent article by Kate Davies on their history in 60 North, a Sheltland magazine, which can be read on pg 15 here: http://edition.pagesuite-professional.co.uk/launch.aspx?referral=other&pnum=&refresh=7f1An0P41N2b&EID=1eed2076-626a-4831-b946-b46d9c23f67f&skip=

To summarise, the Shetlands were actually commercially well connected by sea from the 17th century, and Shetland women supplemented their incomes by producing and selling wool products, particularly stockings, to merchants. By the 18th century, government trade restrictions and competition from mainland knitters meant that their income from this went down, so they had to change, innovate and specialise in order to still be profitable, specifically by carving out a niche of luxury fine openwork products. The fashion for lace in the Victorian era made handmade openwork products (as oposed to machine produced lace) highly desirable to show a woman's status as a wealthy individual. Several examples were shown at the Great Exhibition of 1851, making it even more fashionable. Towards the end of the 19th century, the shawls started to fall out of fashion, but the producers continued to adapt, creating black versions aimed at the elderly and for mourning.  Kate Davies writes: "The fine openwork Shetland shawls and stoles that adorned the shoulders of wealthy Victorian ladies were profoundly innovative accessories, developed in response to the demands of a rapidly changing market, and prey, like any other nineteenth century grament, to the fickle fortunes of fashion".

There's a lot more detail in the article which is a really interesting insight into the drivers behind Victorian fashions from the perspective of a specific product, and I highly recommend it as an interesting read if you're interested in textile history or Victorian fashion. The writer also has a great blog here: http://katedaviesdesigns.com/ 

Meanwhile I'm going to enjoy and appreciate the lovely shawl my mother has made me, but it is likely to be carefully displayed in the nursery and occasionally worn by myself rather than let near baby very often. But that's ok, as his other grandmother also a skilled knitter, also spent 6 months knitting a beautiful shawl for him, which is luckily a bit less delicate and so usable day to day! Here it is, and isn't it lovely?


Wednesday, 6 June 2012

Dressing for a pregnant weekend in the 1920s - part 2

The reason I've been away from blogging for a while this time is that I've been a bit busy having a baby! The last weeks of pregnancy i was too tired all the time to post, and then, well, I've been a bit busy with new baby. This means I never got around to posting about the second 1920s maternity dress I made for  a weekend away a couple of months ago, so here it is, finally:


This dress was based on Patterns of Fashion 2 pattern 29A, a Madeleine Vionnet dress from 1925. The dress has a natural A-line shape to it, cleverly designed with triangular insets and a pointed hem on each side, which could theoretically accommodate my bump without much adjustment.

I was very wary that this dress would not work out at all, so I made a toile from cheap lining fabric to check it would fit over made, and then made the final version from pretty cheap crushed velvet (I don't usually like crushed velvet but it actually worked quite well for this, I think), instead of the silk crepe romaine of the original.

The dress fits together with triangular inserts at neck and hips, which are then covered with a tear drop shaped decoration. This is how the dress looked pre-decoration:


Not having the skill or the time to embroider decoration straight onto the fabric, I used three applique's of gold lace sewn over black satin. I rather like the side panels, but I'm not keen on the front panel - it feels rather large and obvious, but perhaps that's because it's not a great look over a large stomach. I also found that the armholes came out rather strangely - I suspect this is due to my own clumsy attempts at adjusting the dress to my bust size, but is something worth keeping in mind for using the pattern in the future. Here's how the final dress looked on me;

It came together fairly easily when sewing, and apart from getting the cut right when scaling it up, is a fairly simple project. It did alright as a maternity dress, but quite clearly did not hang as originally intended. If I had the pattern cutting skills, making it somewhat more voluminous may have made it hang and work better - however the truth is that 1920s styles are very hard to make look good on a maternal figure. This is a reasonable pattern to use for a twenties maternity dress, and probably more flattering than many of the straight up and down styles or dresses with waistlines at the hip, which make a pregnant belly look rather like a beer belly...

I also dyed an old pair of satin shoes that started out cream but had become rather soiled and battered to match the dress. At some point I will try to post something about my experiments with shoe dyeing!

And here's how the dress looked on a dressmakers dummy with no bump; once I've lost the baby weight a bit more I'll try to post up some photos of how it looks on a non-pregnant figure;


 Another dress I wore over the weekend was made and leant to me by a friend who had worn  it during prgnancy herself (to my twenties themed hen do, as it goes). This one is from the Folkwear 256 Monte Carlo pattern http://www.folkwear.com/264.html (it also includes a matching wrap to go over the dress). No adaption had been made to the pattern to allow for prgnancy, but it worked pretty well. I have no personal experience of how easy the pattern is to use and make up, but it's definitely one to consider if looking for twenties dresses that will work for pregnancy:


Monte Carlo dress from the side, showing off the bump as much as possible!

Monte Carlo dress from the back, with added diamante for the ocassion

Monte Carlo dress with wrap

Tuesday, 5 June 2012

Tutorial: posh bunting


As the long Jubilee weekend draws to an end, this is rather belated, but pretty bunting is still a nice way to decorate gardens and indeed inside for garden and tea parties. I recently made a whole load of what I call ‘posh’ bunting for my parents 40th wedding anniversary party, and thought it might be nice to share how I made it (although I did make it up as I went along, so there may be better ways of doing this). I call it ‘posh’ bunting because it’s properly put together and finished, so it looks a bit nicer and will last a bit better than doing it the easy, simple way. If you’re making bunting for street parties, you need a lot of it, so it’s probably best to make simple bunting, which essentially just involves cutting out lots of fabric triangles (I’d recommend using pinking shears to avoid the fabric fraying) and roughly sewing it to lengths of ribbon. But if you want to make something more finished and hard wearing, here’s how I go about it:

You will need:

A selection of fabrics of your choice, appropriate for the look you’re going for; I bought a selection of metre long strips of cotton gingham and ditzy floral patterns in a range of colours. If you do a lot of sewing and have a store of fabric off-cuts, its worth raiding your stash to see if there’s anything appropriate.
2cm wide bias binding slightly longer than the length of bunting you want to make.
Sewing machine
Thread matching the bias binding
Pins
Ruler
Fabric chalk

1) lay out you fabric folded in half (you may want to pre cut the fabric if you want to make smaller bunting). Use a ruler and chalk to draw out triangles dividing up the fabric, like this:


Pin the fabric in place at the corner of each triangle so it doesn’t slip around when you’re sewing it.

2) The chalk lines are where you’re going to cut, so sew about ½ to 1cm on each side of the chalk line (depending on the size of bunting you’re making, to leave enough seam allowance). Cut along the chalk lines to make a nice pile of triangle shaped fabric pieces. The top side of each (that will be attached to the bias binding) needs to be open, so you will need to cut the closed side on half of them.


3) trim off the pointy end of the triangle, after the point of the sewing, so that you can now turn each triangle inside out without that tip creating a lunp at the end of the triange. It’s probably worth here sitting with a knitting needle or something else pointy to push the point of the triangle out nice and sharply.

4) Iron the triangles nice and flat:


 Arrange your triangle sinto nice neat piles so you can keep track of the order of colours OR if you prefer a more random look, just shuffle them all up together into one pile.


 5) fold your bias binding in half and start sewing it together so that it is a nice neat string about 1cm wide. About 20am along, stop and pin your first triangle in place so that the bias binding encases the open side of the triangle neatly. Continue sewing along the binding to fix in place:


Then continue sewing, leaving an appropriate gap to your taste between that triangle and the next. Attach each triangle in the same way until you have sewn right the way along the bias binding, leaving at least 20cm at the end after the last triangle.

6) create a neat loop by folding over the end of the bias binding and sewing together:


And that’s it; you should get something looking like this:


It’s pretty easy to do, but it is more time consuming and costly than the simple way of making bunting. It’s still cheaper than nicely made shop bought bunting – I made about 25 meters for just over £10, whereas 5 meters of similar bunting from Paperchase set me back about £15 last year. I also plan to get lots of use out of it, so for me it was worth the effort, and I’m pretty pleased with the result.


Sunday, 8 April 2012

Dressing for a pregnant weekend in the 1920s - part 1

As I mentioned a while ago, I recently had to pull together outfits for a 1920s themed weekend in the country - not usually a problem, since I already own lots of twenties originals and reproduction clothing, but this time, being nearly 6 months pregnant meant nothing fit! I decided to make two dresses, and managed to borrow a third from a friend who'd been in a similar predicament when she was expecting a while ago (in that case needing a twenties maternity dress for my hen do!). I'll explain here which patterns I used, what I did to adapt them for maternity, and how well I think they worked and what I would do differently another time.

The two I made are based on two original 1920s dresses featured in Janet Arnold's Patterns of Fashion 2. I cannot recommend her books enough (and you will find many re-enactors and fashion history buffs say the same), even if you are not into making clothes yourself, the wonderful illustrations of the dresses and detailed descriptions of the originals are fascinating and highly educational. The really exciting thing about the books however is that they include 1/8th scaled patterns of the originals, so theoretically you can scale them up to make reproductions of the originals. Given that this includes classic patterns by some very famous designers, this is hard to resist!

However, Arnold does stress that given that the original dresses the patterns are based on were made for specific women not necessarily of standard size, really you need to use pattern drafting skills to adapt them to your needs. Unfortunately I've never had the chance to learn pattern drafting properly (on the 'things to do' list!), so I picked two dresses whose measurements looked like they would probably fit over my current shape and simply scaled them up with minimal adjustments based on guesswork.


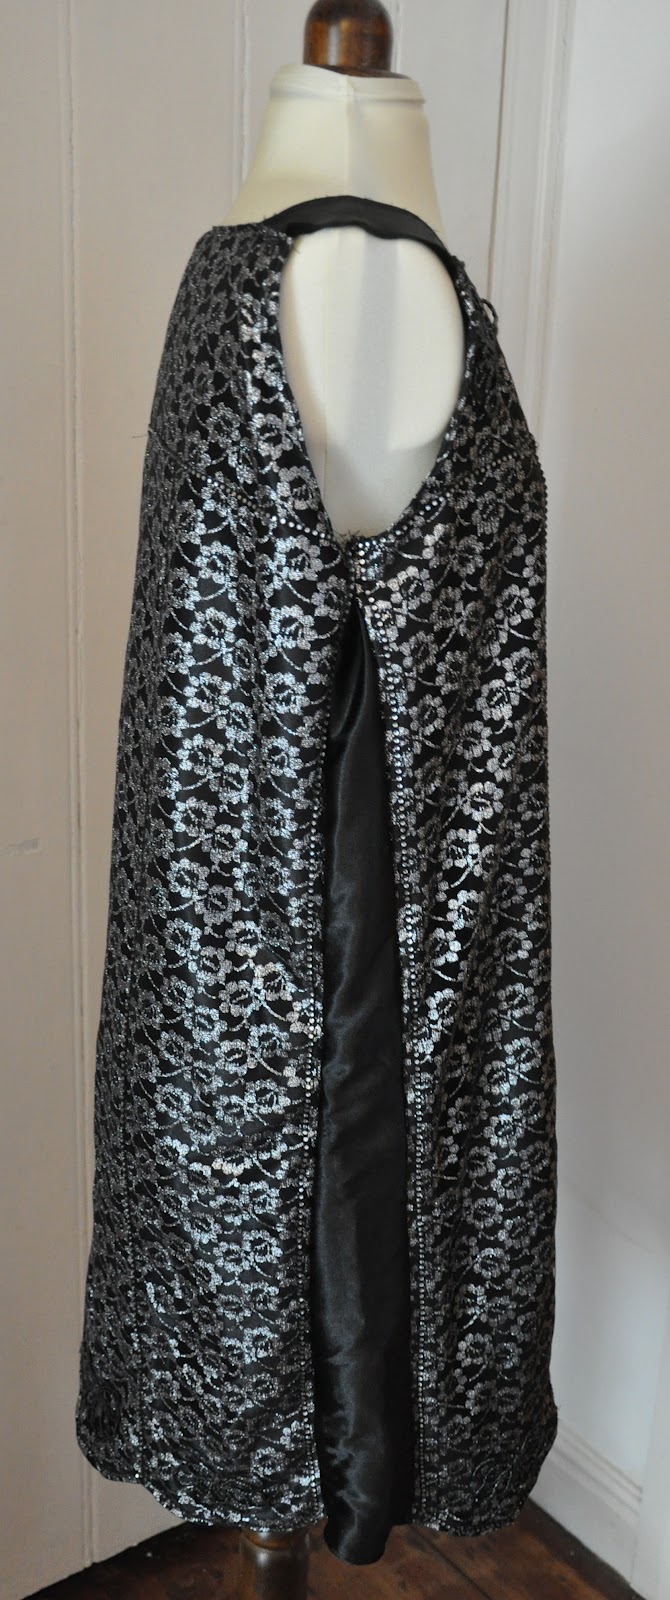
First up is the black and silver dress I mentioned a while ago. This is pattern 27A in the book, and is based on a 1923-25 evening dress in the Victoria and Albert Museum. I ended up changing this quite dramatically which undoubtedly affected how is hung, but in essense it is a straight up and down heavily beaded tunic dress with a scallopped bottom. Unable to afford beaded fabric or the time and skill to add that much decoration itself, I used a layer of patterned silver netting over the crepe back black satin base. This probably made the fabric and drop more stiff than the original would have been. Once cutting and tring it pinned together, I found that the line of the shoulder straps did not work well with a larger maternal bust, so removed the sloped versions in the pattern and replaced them with wide, straight strips of black satin which hung better for me at the moment.

alternate shoulder straps


Finally, to incorporate my bump, I made the whole thing more A-line by adding triangular inserts of extra black satin into each side. My hope is that after pregnancy I'll be able to remove these and sew it up as originally designed and be able to use the dress again.

For decoration, I added lots of diamante and also some flower shaped beads that I bought cheaply at Annie's vintage clothes store in Islington;


They are very pretty, but are apparently originally french grave decorations (the mind boggles!). The store also mentioned that a stylist of Vogue had just bought a load of them for use in a shoot, so I'll have to keep an eye out for that. I wanted to make the dress look more highly decorated, hence using them, and they were a quick and easy way to add beading, but I wasn't entirely satisfied with how well it worked: the black beads merged too much into the dress to be very noticeable, and the ends of the wire I hadn't sealed off properly poked through the fabric and laddered my stockings! Oh well, it was a nice idea...

diamante and beaded detail


And here's how  the finished item looks on a non-pregnant dress mannequin:


And here's the back and side, showing the additional panels added for my bump;

back
Side panels

scalloped edge detail


It is, theoretically, a very simple dress to make, comprising of only two pieces. It's probably a pretty good way place to start with the Janet Arnold patters if you're as inexperienced at pattern drafting as myself.

Thursday, 23 February 2012

1920s maternity

My life has been somewhat absorbed of late by two things: moving house and being pregnant! Major life events that really take it out of you, it has to be said. It's meant that my usual vintage obsession has somewhat been dented over the last few months from a combination of busy-ness, tiredness, and frustration with the difficulties of combining vintage clothing with the maternity look.

Don't get me wrong - there are vintage maternity clothes out there - it's just that it's hard to justify investing in good pieces for just a few months. My maternity clothes have been cheap as chips from mainstream fashion shops, mostly bought in the sales for a few quid each. Using vintage accessories has been the best way of keeping vintage part of my look. I have searched and browsed longingly over some lovely vintage maternity pieces though, and at some point I will perhaps blog about them, since at least that would give some use to my browsing!

My current challenge, however, is putting together a 1920s weekend wardrobe that fits (given I'm now nearly 7 months gone) for a weekend away in a couple of weeks. Only one of my original twenties dresses now still fits, so I'm resorting to making a couple of dresses from original twenties patterns and adapting them to my strange shape.

My first test of this was for another twenties event a couple of weeks ago, for which I tried to make a black day dress. It was not an overwhelming sucess, but here's the result;


It's adapted from a 1928 Vintage Vogue pattern I've used a number of times, but the result really had no relationship to the original. My hormone addled brain completely miscalculated and the whole thing ended up far too big, so I ended up adding lots of tucks and pleats, especially around the neckline, to make it even vaguely fit properly. I did wear it for the weekend, somewhat reluctantly, but with a big cardigan over it to hide it's worst sins.


One of the main things I learned from that weekend is that the 1920s style is not flattering for a pregnant lady. It's the style most likely to fit, I suppose, because it isn't as fitted as other eras, but the 1920s look is all based on a straight up and down sillouette, and a pregnant belly gives anything but that look! The worst part is the low waist line. Whilst empire line clothes gathered under the bust are quite pretty and flattering for the pregnant figure, the low twenties waistline just makes you feel like you have a huge beer belly. Not a good look!

So I've decided to give up on this version of the dress, and have cut it up for my next attempt. This time I'm going for a tunic style that doesn't have any distinct waistline at all, in the hopes it'll skim over my bump a bit more attractively. It is adapted from Janet Arnold's Patterns of Fashion 2 (pattern 27a). This is my first attempt at using one of her patterns, but it is theoretically quite a simple one. I am however adding side panels to make room for my bump, so it'll be interesting to see how that works; but I'm trying to make it in such a way that I can reconstruct it and wear again after pregnancy.

This time it's an evening dress, so the black cloth from the day dress is being used as the lining, covered by silver lame lace net. Then I'm adding a lot of diamante;


The diamante was a challenge, but does sparkle so prettily;


So far I have tried the dress on pinned together; it's working better than the last attempt, but I'm still frustrated by how my bump makes it look so far from the twenties silhouette; this is just something I have to accept, I guess. Still lots of work to do on it and the final version may look better; I shall update as it comes together!

Sunday, 4 December 2011

New project: restoring a 1920s beaded dress

During a recent visit to my lovely in-laws, my mother in law mentioned that she still had an original 1920s beaded dress that had belonged to her grandmother that I could have, since she knew I loved vintage clothes. Given that my wedding ring originally belonged to the same grandmother and I am somewhat sentimental, getting to wear this dress is a particularly lovely though.

We did however have to venture into their attic in an attempt to find it (always a somewhat nervouse enterprise in case the ancient dress has somehow got damp or moth ridden and turns out to be no ruined!). After much clambering around and rifling around old boxes and suitcases in the attic with flashlights, it started to look like our search was in vain - could it possibly have been thrown out by accident! Oh Noes!

Luckily my mother-in-law then remembered that she's never put it in the attic in the first place - it was in fact carefully wrapped in the bottom of a draw in the main part of the house, and didn't even have that usual mothball scent of old clothes not worn for a long time and indeed smells quite delightful.

However, it does need some restoration, so this is my new project:


This picture is how it looked as found.

It has been used for fancy dress in decades past (something that has probably stopped many beautiful old clothes from being thrown away, so we should be grateful for it), which means that it had been shortened, and there were rusty staples in it in places where tin foil had been attached for some reason. The beading itself has also come away in several places.

Luckily the shortening only involved a wide hem being added and the shoulders sewn up, so this was easy to fix. The staples also came away with relative ease and left minimal marking.

However fixing the beading will be more challenging. First I need to firmly fix back in place the beading that is still there but loose (which is why I still haven't tried the dress on for fear of loosing more of them - so I have no idea whether it will even fit when I'm finished!). Then I need to decide whether to try to recreate the beading that is missing. The original pattern of the beading can still be clearly seen in the marks that it left in the cloth. However replacing the missing beads presents several challenges. Firstly - finding beads similar enough to the originals. They are a silver/grey shade, which I think I should be able to find, but the difference between old and new (gven they will be made using different techniques) may be too obvious. Secondly, are my sewing skills up to it? I have a little practice at attaching beading from when I made my replica 1920s dress and also from a couple of other projects, but to be honest I found it tricky to do and I'm not sure it's up to the standard of 1920's dressmakers!

So all in all, there's a risk that I could put a lot of effort into trying to recreate how it looked when new without it actually working. So the question is - should I try it, or should I leave it and be content with a dress where some of the beading is missing - and will it show too much for the dress to be wearable?

I will post more pictures as the project progresses and hopefully eventually how it looks on! The colour is so beautiful, I can't wait til I can finally wear it out!